Arm Your Atari - Part 2 of 2
by Ted Wilmot
ANALOG Computing, August 1986, p. 85-90
Welcome back for another installment of Arm your Atari. I hope your construction efforts have been successful up to now, because the real fun's about to begin.
As I mentioned at the close of last month's section, no matter how skilled you become, when you control the arm with timing loops, you can never really be sure of its position. If you tried programming the arm to move the game pieces supplied with it, you were greatly dissappointed. There was no way of predicting the arm's position.
Right now, our arm is essentially lost--it can't tell the computer where it is in space. However, with directional feedback, the computer can continuously monitor the position of every joint, compare this data to some preprogramed values and allow compensation for any errors. Moreover, with feedback, the arm can be programmed to automatically perform any task the operator would have had to execute manually. Also, with feedback, the arm will be able to repeat tasks with great precision--just like an industrial robot.
To add feedback to the arm, potentiometers (Atari paddle controllers) must be attached to every joint. This way, the computer can simply read (in BASIC) the values of the paddles. It can then output data corresponding to the direction the arm should be moved, with respect to some reset values. In all, four potentiometers will be required: two for the shoulder joints, plus one for the elbow and one for the wrist.
If you've been keeping track, two joystick ports will be required for the feedback data (one port for every two potentiometers), in addition to the port required for the output data. Let's see ... that's three!
I'll bet you XL owners are really happy at this point, but don't despair; I'm revising the hardware/software to allow you to get away with two ports, with a slight decrease in speed. If there's enough interest, I'll test the design and send it in.
Onward.
Enough preliminary stuff; let's plunge in! To begin with, you'll need four (4) 1-meg ohm linear taper potentiometers with 1/4" shafts (preferably plastic). Atari paddles are really 1-meg potentiometers in disguise, but I wouldnt recommend using them. The shafts are too large, and the potentiometer housings are difficult to work with.
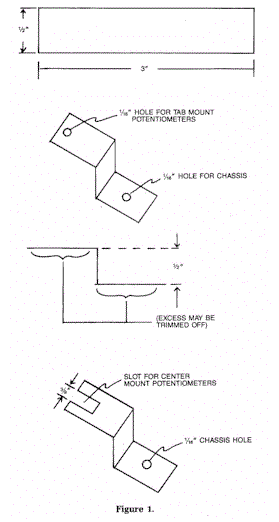
Cut the shafts of two potentionieters, so that 1/2" projects from the housing. Then cut four pieces of sheet metal into 1/2" by 3" strips. Drill them according to Figure 1, depending on the type of potentiometer you're using.
|
Figure 1. (click image to enlarge) |
|
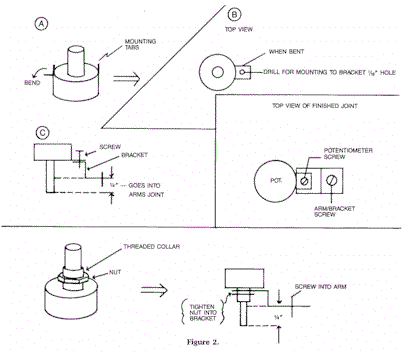
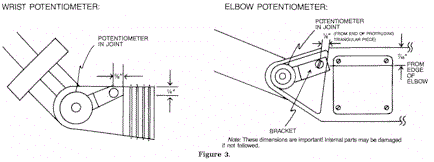
Next, attach two potentiometers and strips, bending the strips as per Figure 2. Then set the elbow/wrist joints in their mid-positions. Set the potentiometers in their midpositions, as well. Referring to Figure 3, install the wrist and elbow potentiometers. Wasn't that easy?
|
Figure 2. (click image to enlarge) |
|
|
Figure 3. (click image to enlarge) |
|
Beware--life gets harder. Drill two 3/32" holes in the shifts Of the remaining two potentiometers, to a 1/4" depth. Now obtain a 3" piece of 7/8"-round stock threaded with 6NC32 threads. A cut off screw works well, or you can thread a piece of the energy level indicator support left over from last time.
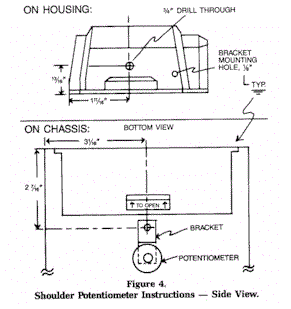
Cut the threaded stock into 1" and 2" pieces. Screw the 1" piece into one of the potentiometers. Now, remove the housing on the end of the arm, the one that says Radio Shack ARMATRON and drill a 1/4" hole in the housing, as in Figure 4.
|
Figure 4. Shoulder Potentiometer Instructions -- Side View. (click image to enlarge) |
|
Now, remove the screw that would lie directly behind the hole and reinstall the housing. Firmly screw the end of the shaft into the hole. Next, attach one of the sheet metal strips to the potentiometer, and drill a hole through the strip and the housing as in Figure 4. Use a small machine screw to hold the bracket to the housing.
Now for the bottom-potentiometer. As I mentioned last time, a potentiometer has to be mounted under the arm's chassis to detect the shoulder's position. As you probably know by now, the shoulder, like the wrist, is capable of rotary motion.
Unfortunately, the potentiometer has a limited turning angle. Therefore, we must construct a free-spining potentiometer capable of rotary motion. To do this, we must disassemble the remaining potentiometer. With it taken apart, you'll notice a dimple in the housing directly below the contacts. This is the enemy; destroy it, being careful not to damage the rest of the potentiometer's housing.
With the dimple removed, the wipers (electrical contacts on the shaft's end) must be altered. Bend the wipers at the ends, so they wont get caught on the contacts--regardless of the direction of rotation.
Now, remove the screw directly below the arm's main shaft; screw in the remaining 2" threaded piece. Attach the remaining metal bracket to the potentiometer and screw it onto the shaft. Drill a hole through the bracket and the chassis as seen in Figure 4 and attach the bracket to the chassis using a sheet metal screw.
Now for the wrist ... Unlike the other arm joints, the wrist joint is nearly impossible to mount a potentiometer on. The joint is fed by three gears: one to raise and lower, one to rotate, and one to open or close the "jaw." All are contained in the wrist housing, making it too cramped to mount a potentiometer inside.
How can we achieve feedback from the wrist to the computer? Well, I'm sure you electrically oriented types have just thought up at least a dozen ways-optical, magnetic and similar approaches, all of which can be implemented outside the wrist housing.
While optical and magnetic routes are perfectly acceptable, they would generally be too expensive and technically involved for our application. I've decided to use micro switches for the job. In this way, the switches can be mounted outside the wrist housing, and may be actuated by the turning jaw-thus eliminating any wires to the jaw itself!
Moreover, the switches, like the potentiometers, can be read directly by the computer in BASIC with a PTRIG command. If you have a 400/800 machine with four joystick ports, you could (theoretically) read eight switches. While that amount of resolution would be nice, the wiring would be obtrusive.
I elected to go with two switches on my prototype arm, one each for vertical and horizontal jaw orientation. This doesn't sound like many switches, and there isn't any angular resolution to speak of, but it's more than adequate for our purposes.
Before. the switches can be mounted on the wrist housing, the latter must be altered. To do this, the wrist must be dissassembled. Remove the wrist-mounted potentiometer and the two round black "bearings."
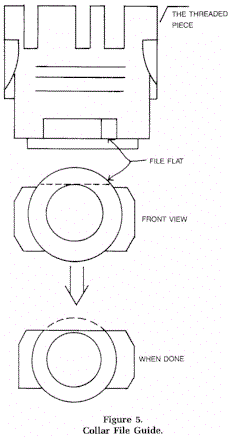
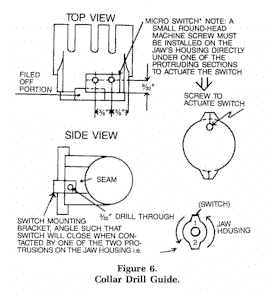
Then remove the two screws holding the wrist housing together. Separate them, releasing the jaw and associated gears. Now, file down the round collar at the end of the wrist housing as shown in Figure 5. Next, drill the housing pieces as in Figure 6 and install the switches/mounting brackets.
Note: make sure all switch levers face the same direction of rotation with respect to the jaw's axis of rotation.
With the switches in place, reassemble the wrist housing and reinstall the wrist potentiometer.
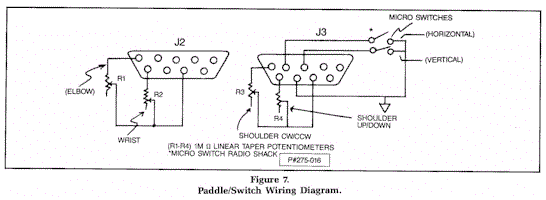
Now for some wiring ... In my arm, the potentiometers and switches were wired as you see in Table 1. it would be worth your while to check the response of each joint individually, with a simple PTRIG/PADDLE(x) routine, before soldering any wires together.
If you're unfamiliar with the wiring convention used in Atari paddles, Figure 7 shows how to connect two potentiometers to a single joystick port.
|
Figure 5. Collar File Guide. (click image to enlarge) |
|
Note: to avoid software conflicts, use joystick port 3 to read the PTRIG (wrist) values--i.e., PTRIG (4-5).
If you've been wondering why no feedback has been added to the jaw itself, the answer is simple. The jaw is intemally protected from damage due to too much opening and closing. Therefore, it's best to use simple timing loops to control it.
Trying it out.
Now to test our creation ... Listing 1 shows a BASIC program that allows you to read in'the values of the various joints in a data statement, and have the arm execute the movements you wish-based on your data.
To use the program manually (with the joysticks), move the arm to the object you want to pick up. Align the wrist so one of the two switches is closed (the orientation may be important at times). Type GOSUB 5000 to read the joint values-and write them down. Manually move the arm to the target destination and, again, type GOSUB 5000.
|
Figure 6. Collar Drill Guide. (click image to enlarge) |
|
Repeat the above procedure for all the objects you want to move, then put the data into Line 170's data statement. Note: change the variable L (Line 10) to reflect the number of iterations required (i.e., the number of data values divided by 2).
Good luck with your new toy. I hope all of you enjoy your creations as much as I do mine!
| Ted Wilmot is a senior at SUNY Binghamton, majoring in Electrical Engineering Technology. He has an A.A.S. in E.E.T. and has been interested in computer/electronics since 1972. He's designed and built numerous electronic/software projects, most frequently with BASIC, APL and assembler. |
|
The two-letter checksum code preceeding the line numbers here is not a part of the BASIC program. For further information, see the BASIC Editor II, page 43. |
|
Listing 1. BASIC listing. | |
|
|
Figure 7. Paddle/Switch Wiring Diagram. (click image to enlarge) |
|
| Table 1. | |
|